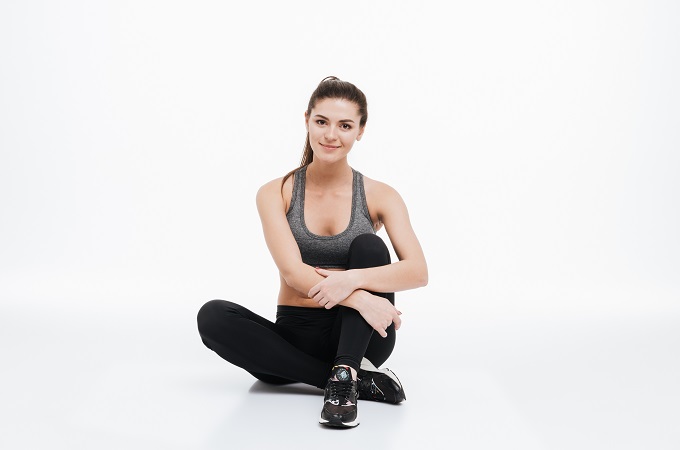
Do you suffer from upper back pain? It can be a nuisance. But it doesn’t have to be something you live with forever.
Yoga is an ancient form of exercise. It can help you find relief from upper back pain. Through regular practice, you’ll be able to improve your posture. Moreover, you can also strengthen your back muscles.
Additionally, yoga can help reduce stress and provide a sense of well being. In this blog post, we’ll discuss how yoga can help relief upper back pain. We’ll also share some tips to get the most out of your practice.
We’ll also look at specific poses that can help strengthen the muscles in your back.
What is Upper Back Pain?
Upper back pain is a common problem. It can cause discomfort and hinder daily activities.
The upper back, or the thoracic spine, is between the neck and lower back. It supports the rib cage and protects vital organs. This includes the heart and lungs.
The causes of upper back pain can vary from poor posture and repetitive motions to injuries and degenerative conditions. Some common symptoms of upper back pain include:
- Stiffness
- Soreness
- Tightness in the muscles
Fortunately, there are ways to manage and relieve upper back pain. Yoga is a great option.
Practicing yoga for upper back pain can help alleviate tension and improve posture. It increases flexibility and strength in the muscles surrounding the thoracic spine.
How Yoga Can Help to relief Upper Back Pain?
Luckily, yoga is an excellent remedy for upper back pain. Here’s how:
- It helps to release tension and tightness in the upper back muscles.
- It reduces pain and stiffness.
- It improves posture and spinal alignment
- It reduces pressure on the upper back.
- It encourages deep breathing. This increases oxygenation to the upper back muscles. It also promotes healing and reduces pain.
To target upper back pain specifically, several yoga poses can be beneficial.
Some examples include:
- Child’s Pose
- Downward Facing Dog
- Sphinx Pose
- Cobra Pose
- Bridge Pose
It’s important to approach yoga for upper back pain carefully and cautiously. Especially if you’re a beginner, always listen to your body. Avoid any poses that cause pain or discomfort.
It’s also a good idea to practice under the guidance of a qualified yoga instructor. They can offer modifications and adjustments as needed.
In summary, yoga is an excellent way to ease upper back pain. You can reduce tension, improve posture, and promote healing by practicing specific yoga poses for upper back pain.
So roll out your mat and give it a try!
Benefits of Yoga for Upper Back Pain:
Upper back yoga has numerous benefits. Some of the main benefits include:
- Improved flexibility:
Regular yoga practice can help improve your overall flexibility. This can help ease tension and discomfort in your upper back muscles.
- Increased strength:
Many yoga poses target the upper back muscles. This can help to strengthen and tone them. This helps to reduce pain and prevent future injuries.
- Reduced stress and tension:
Stress and tension can contribute to upper back pain. Yoga is known for its ability to reduce stress and promote relaxation.
- Improved posture:
Poor posture is a common cause of upper back pain. Yoga can help improve your posture by strengthening the muscles. This supports your spine and promoting greater awareness of your body alignment.
- Better breathing:
Many yoga practices include breathing exercises or pranayama. These can help to improve lung capacity and increase oxygen flow to the upper back muscles.
In addition to these benefits, yoga can be an effective way to improve overall physical and mental health and promote feelings of calm and well being.
Types of Yoga for Upper Back Pain:
Various types of yoga practices can help alleviate upper back pain.
Depending on your fitness level, flexibility, and personal preferences, you can choose the one that suits you best.
Here are some of the most effective types of yoga for upper back and neck pain:
1. Restorative Yoga:
Restorative yoga is a gentle form. It has different poses. This focuses on deep relaxation and restoration. It involves holding passive poses for several minutes. It supports the body by using props such as blankets, bolsters, and straps. This practice helps release tension and stress and promotes relaxation and healing.
2. Hatha Yoga:
Hatha yoga is a classical form. It focuses on physical postures and breathing techniques. This practice is great for relieving upper back pain. Since it helps stretch and strengthen the back muscles, it helps improve posture, balance, and flexibility.
3. Iyengar Yoga:
Iyengar yoga is a precise and structured form. It focuses on correct alignment and posture. It involves using props such as blocks, straps, and blankets to correctly align each pose.
This practice is great for those suffering from poor posture and upper back pain. It helps correct postural imbalances and strengthen the back muscles.
4. Vinyasa Yoga:
Vinyasa yoga is a dynamic and flowing form. It links breath with movement. It helps release muscle tension and promotes relaxation. This practice is great for those suffering from upper back pain due to tension and stress.
Vinyasa yoga can also help improve flexibility, strength, and endurance.
Tips for Practicing Yoga for Upper Back Pain:
However, practicing yoga poses specifically designed for upper back pain is important to avoid exacerbating the issue.
Here are some tips to help you get the most out of your yoga practice for upper back pain:
- Start Slow:
Start slow and gradually build up your strength and flexibility. Focus on gentle stretches. Start breathing exercises to warm up your muscles.
- Be Mindful:
Be mindful of your body and how it feels. Avoid pushing yourself too hard and listen to your body’s signals.
- Use Props:
Props such as blocks, straps, and blankets can be incredibly helpful. They can provide support. They also help you achieve proper alignment in each pose.
- Modify Poses:
Don’t be afraid to modify yoga poses. If a particular pose is causing discomfort, try adjusting it or swapping it out for a different one.
- Seek Guidance:
Seek guidance from a qualified yoga teacher. They can help you find the best poses for your needs. They’ll also ensure you practice safely and effectively.
You can find much-needed relief from upper back pain by following these tips. You will also improve your overall health and well being.
Remember to always listen to your body and seek guidance if needed.
Common Yoga Poses for Upper Back Pain:
Regarding yoga, numerous poses can help ease upper back pain.
Here is some common upper-back yoga poses that you can try:
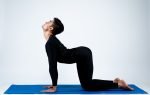
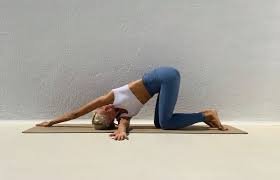
1. Cat Cow Pose:
Cat Cow Pose, also known as Marjaryasana/Bitilasana, is a common yoga pose that combines two complementary movements to stretch and mobilize the spine. It’s often performed as a part of a warm-up sequence or as a standalone pose for spinal health and flexibility. Here’s how you can do the Cat Cow Pose:
- Start on your hands and knees, aligning your wrists under your shoulders and your knees under your hips. Keep your palms flat on the ground with fingers spread wide, and your knees hip-width apart.
- Begin with the Cow Pose: Inhale deeply, arch your back, and lift your sitting bones and chest towards the ceiling. Allow your belly to sink towards the ground, creating a concave shape in your lower back. Lift your gaze upward and slightly forward, without straining your neck.
- Transition to the Cat Pose: As you exhale, round your spine upwards like a cat, tucking your tailbone and drawing your navel towards your spine. Let your head drop gently towards the ground, releasing any tension in your neck. Feel the stretch along your entire back.
- Flow between the two poses: Inhale as you transition back to the Cow Pose, and exhale as you move into the Cat Pose. Continue this gentle, flowing movement, synchronizing your breath with each motion. Allow the movement to initiate from your pelvis and ripple through your spine, maintaining a fluid and controlled rhythm.
- Repeat the sequence: Continue this fluid back-and-forth motion for several rounds, gradually increasing the range of motion and exploring the stretch in your spine. Pay attention to how the movement feels in your body, and adjust as needed to find a comfortable stretch.
Cat Cow Pose offers several benefits, including:
- Spinal mobility: The alternating movement between spinal extension (Cow Pose) and flexion (Cat Pose) helps improve the flexibility and mobility of the entire spine.
- Core activation: The engagement of the abdominal muscles during the Cat Pose activates the core and helps strengthen the abdominal muscles.
- Stretching and strengthening: Cat Cow Pose stretches and strengthens the muscles in the back, shoulders, and neck, relieving tension and promoting better posture.
- Stimulating the breath: The synchronized breath with movement in Cat Cow Pose helps deepen the breath, bringing more awareness to the breath cycle and promoting relaxation.
Remember to listen to your body and modify the pose if you have any injuries or limitations. It’s always best to practice under the guidance of a qualified yoga teacher, especially if you’re new to yoga or have specific health concerns.
2. Downward Facing Dog:
Downward-Facing Dog, also known as Adho Mukha Svanasana, is one of the most well-known and widely practiced yoga poses. It is often included in both yoga sequences and as a standalone pose due to its many benefits for the body and mind. Here’s how you can do Downward-Facing Dog:
- Start on your hands and knees, aligning your wrists under your shoulders and your knees under your hips. Keep your fingers spread wide and your knees hip-width apart.
- Curl your toes under and lift your knees off the ground, straightening your legs as you push your hips up and back. Your body should form an inverted “V” shape. If your hamstrings feel tight, you can keep a slight bend in your knees.
- Press your hands firmly into the mat, distributing the weight evenly between your palms and fingers. Your index fingers should point forward, and your hands should be shoulder-width apart. Engage your arms and imagine pushing the mat away from you to create space in your upper back.
- Lengthen your spine and draw your shoulder blades away from your ears. Allow your head to hang freely between your arms, with your gaze directed toward your feet or the space between your thighs. Relax your neck and jaw.
- Ground down through your heels and actively press them toward the floor. If your calves or hamstrings feel tight, you can pedal your feet by bending one knee at a time, alternating between sides to gently stretch the back of your legs.
- Maintain a steady breath as you hold the pose, taking slow, deep inhales and exhales. Allow your breath to guide you into a state of relaxation and surrender.
While practicing Downward-Facing Dog, you can experience the following benefits:
- Stretches and strengthens: This pose stretches and lengthens the spine, shoulders, hamstrings, and calves. It also strengthens the arms, shoulders, and core muscles.
- Energizes the body: Downward-Facing Dog is an invigorating pose that increases circulation and brings fresh blood flow to the brain, leaving you feeling revitalized and alert.
- Improves flexibility: Regular practice of this pose can gradually improve flexibility in the entire body, especially in the hamstrings, shoulders, and spine.
- Relieves tension: Downward-Facing Dog helps release tension in the neck, shoulders, and upper back, which is especially beneficial for individuals who spend long hours sitting or working at a desk.
- Calms the mind: The pose allows the head to hang below the heart, promoting a sense of calmness and relaxation. It can also help relieve stress and anxiety.
As with any yoga pose, it’s important to listen to your body and modify the pose if needed. If you have any specific injuries or health concerns, consult with a qualified yoga teacher or healthcare professional before practicing.

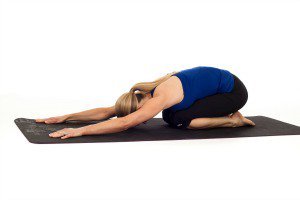
3. Child’s Pose:
Child’s Pose, also known as Balasana, is a gentle and restorative yoga pose that is often used for relaxation, grounding, and releasing tension in the body. It is a resting pose that is commonly practiced during yoga classes and can be performed at any time to provide a moment of calm and restoration. Here’s how you can do Child’s Pose:
- Begin by kneeling on the floor. Bring your big toes together and separate your knees about hip-width apart. If this position is uncomfortable for your knees, you can place a folded blanket or bolster between your calves and thighs for support.
- Exhale and slowly lower your torso between your thighs. Your chest should rest on or between your thighs, and your forehead should come to the floor. If your forehead does not comfortably reach the floor, you can place a yoga block, folded blanket, or bolster under your forehead for support.
- Extend your arms forward with your palms facing down. Alternatively, you can place your arms alongside your body with your palms facing up. Choose whichever arm position feels more comfortable and allows you to relax fully.
- Relax your shoulders and allow them to release any tension. Feel the weight of your hips sinking toward your heels, lengthening your spine and creating a gentle stretch in your lower back.
- Close your eyes, if comfortable, and focus on your breath. Take slow, deep breaths, allowing your abdomen to expand on the inhale and gently contract on the exhale. With each exhale, try to release any tension or stress held in your body.
- Remain in Child’s Pose for as long as you like, allowing yourself to completely surrender and relax. You can stay in the pose for a few breaths or several minutes, depending on your preference and how much time you have.
Benefits of Child’s Pose include:
- Relaxation and stress relief: Child’s Pose helps activate the parasympathetic nervous system, promoting a state of relaxation and reducing stress and anxiety.
- Gentle stretch: The pose gently stretches the hips, thighs, and ankles, providing relief from tension or tightness in these areas.
- Spinal release: Child’s Pose allows the spine to decompress and relax, relieving any strain or discomfort in the back.
- Mind-body connection: The pose encourages introspection and inner focus, allowing you to connect with your breath and cultivate a sense of inner peace and tranquility.
Remember to breathe deeply and listen to your body throughout the pose. If you have any knee or back injuries, it’s important to modify the pose or consult with a yoga teacher or healthcare professional for guidance. Enjoy the calming and rejuvenating effects of Child’s Pose at any time you need a moment of relaxation.
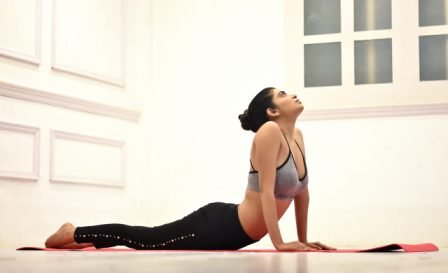
4. Cobra Pose:
Cobra Pose, also known as Bhujangasana, is a fundamental yoga pose that targets the spine, chest, and shoulders. It is often included in yoga sequences to strengthen the back muscles and improve spinal flexibility. Here’s how you can practice Cobra Pose:
- Start by lying face-down on your mat, with your legs extended and the tops of your feet resting on the ground. Place your palms on the mat, slightly below your shoulders, and tuck your elbows in towards your sides.
- Press the tops of your feet, thighs, and pubic bone into the mat to engage your leg muscles and stabilize your lower body.
- As you inhale, begin to straighten your arms and lift your chest off the ground. Use the strength of your back muscles rather than your hands to lift. Keep your elbows slightly bent and draw your shoulder blades down and back, opening your chest and creating space between your ears and shoulders.
- Maintain a gentle gaze forward or slightly upward, without straining your neck. Avoid clenching your jaw and keep your facial muscles relaxed.
- Keep your lower body grounded as you continue to lift and lengthen your upper body. Focus on lengthening your spine, feeling the stretch along the front of your body.
- If it feels comfortable, you can increase the intensity of the stretch by lifting your hands off the mat slightly or even bringing your hands to hover just above the ground.
- Hold the pose for a few breaths, allowing your breath to flow naturally. As you exhale, gently lower your chest and forehead back to the mat, returning to the starting position.
Benefits of Cobra Pose include:
- Strengthening the back: Cobra Pose helps strengthen the muscles of the back, including the erector spinae, which supports good posture and spinal stability.
- Increased spinal flexibility: The pose stretches the spine, stimulating the back muscles and improving flexibility and mobility.
- Chest and shoulder opening: Cobra Pose helps expand the chest and stretch the front of the shoulders, counteracting the effects of sitting or hunching forward.
- Improved digestion: The gentle compression on the abdomen in Cobra Pose can aid digestion and stimulate the abdominal organs.
- Relief from mild back pain: Regular practice of Cobra Pose can help alleviate mild backaches and stiffness, especially in the upper back.
It’s important to note that Cobra Pose may not be suitable for individuals with certain back conditions, such as herniated discs or back injuries. Always listen to your body, work within your limits, and consult with a qualified yoga teacher or healthcare professional if you have any concerns or limitations.
5. Thread the Needle Pose:
Thread the Needle Pose, also known as Parsva Balasana, is a gentle and restorative yoga pose that targets the shoulders, upper back, and neck. It is a great pose for releasing tension and increasing flexibility in the upper body. Here’s how you can practice Thread the Needle Pose:
- Begin on your hands and knees in a tabletop position, with your wrists directly under your shoulders and your knees under your hips.
- Inhale and lift your right arm up towards the ceiling, turning your palm to face outward. Keep your left hand rooted firmly on the mat for stability.
- Exhale and thread your right arm underneath your left arm, reaching it across your mat until your right shoulder and temple rest on the floor. Allow your right ear to come to the mat, if comfortable.
- Extend your left arm forward and place your left palm on the mat, aligning it with your right hand. You can also choose to keep your left hand on your lower back or wrap it around your waist for a variation.
- Relax your upper body and allow your breath to flow naturally. You should feel a gentle stretch in your right shoulder, upper back, and neck.
- Stay in this position for several deep breaths, allowing your body to sink into the pose and releasing any tension or tightness. Feel free to make any micro-adjustments to find the most comfortable and effective stretch for your body.
- To come out of the pose, slowly release your left hand from the mat (if it was extended), place it back on the mat for support, and gently press into your left hand to lift your right shoulder and arm. Return to the tabletop position.
- Repeat the same steps on the opposite side, threading your left arm underneath your right arm.
Benefits of Thread the Needle Pose include:
- Shoulder and upper back release: This pose gently stretches and releases tension in the shoulders, upper back, and neck, providing relief from tightness or discomfort in these areas.
- Increased shoulder flexibility: Regular practice of Thread the Needle Pose can gradually increase the flexibility and range of motion in the shoulders, improving posture and reducing the risk of shoulder injuries.
- Improved spinal mobility: As you thread your arm under your body, this pose encourages gentle spinal rotation, promoting greater spinal mobility and releasing tension along the vertebral column.
- Relaxation and stress relief: The pose allows you to surrender and relax, activating the parasympathetic nervous system and promoting a sense of calmness and relaxation.
As with any yoga pose, listen to your body and modify as needed. If you have any shoulder or neck injuries, it’s advisable to consult with a qualified yoga teacher or healthcare professional before practicing Thread the Needle Pose.
These upper back yoga poses can help stretch and strengthen the muscles. Remember to breathe deeply, move slowly, and listen to your body’s needs. With regular practice, you may find that yoga is a valuable tool for managing your upper back pain.
Conclusion:
Upper back pain is common among people, resulting from many things. This includes long working hours and poor posture. Thankfully, yoga provides a natural and effective way to ease upper back pain.
Regular yoga practice can help you reduce tension and stiffness, increase mobility and flexibility, and improve your posture and overall health. To get the most out of yoga for upper back pain, you need to find the right type of yoga that suits your body and goals. Remember to be patient with yourself as you work towards finding relief from upper back pain.
With time and dedication, you will see the benefits of incorporating yoga into your daily routine.