Do you suffer from back pain? Yoga poses for back pain can be an excellent way to reduce discomfort. It also manages your symptoms. Yoga has been used for thousands of years. It improves physical and mental health. However, it is still an effective tool today. This blog post will provide a detailed guide to yoga poses. They can help alleviate back pain. We’ll cover the following:
- The benefits of yoga
- How to select the right poses
- How to integrate them into your daily routine
With this comprehensive guide, you will gain the knowledge and skills to practice yoga safely and effectively to relieve back pain.
Understanding the Causes of Back Pain:
Back pain is a common problem. It can affect people of all ages and lifestyles.
Understanding the causes of back pain can help you to identify the best ways to manage your symptoms. You can also prevent further damage to your spine.
Some common causes of back pain include:
- Poor Posture:
Sitting or standing in a slouched position can stress your spine. It can lead to back pain.
- Muscle strain:
Overusing or improperly using your back muscles can lead to muscle strains and soreness.
- Injury or trauma:
Accidents or injuries can damage the structures in your back. This also includes your muscles, bones, and ligaments.
- Medical conditions:
Certain conditions, such as arthritis, herniated discs, and spinal stenosis, can cause chronic back pain.
While back pain can be caused by various factors, practicing yoga poses for beginners can be effective. This can alleviate discomfort and improve your overall spinal health.
Incorporate gentle stretches and movements into your daily routine. You can reduce muscle tension and increase flexibility. This can help to reduce your risk of future back injuries.
Benefits of Yoga for Back Pain:
Yoga has numerous benefits when it comes to relieving back pain. Here are some of the key advantages of practicing yoga poses for back pain:
- Improves flexibility and mobility of the spine, reducing stiffness and discomfort
- Builds strength in the back, core, and supporting muscles. This leads to better posture and reduced strain on the back
- Reduces stress and tension. It can exacerbate back pain
- Enhances circulation and oxygenation. Also promotes healing and tissue regeneration
- Boosts overall physical and mental well-being. This includes better sleep, more energy, and greater relaxation
Moreover, yoga can be an effective and safe option for people of all ages and fitness levels. With modified yoga poses for back pain, seniors can safely and comfortably practice yoga to alleviate discomfort and improve their overall health.
Best Yoga Poses for Back Pain:
Some of the most beneficial yoga poses for back pain for seniors include:
- Cat Cow Pose
- Downward Facing dog
- Cobra Pose
- Child’s Pose
- Triangle Pose
Seniors can experience yoga’s physical, mental, and emotional benefits while supporting their back health. Here are some poses to get started with and their benefits:
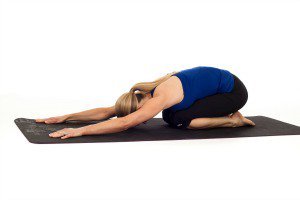
1. Child’s Pose :
This pose gently stretches the lower back, hips, thighs, and ankles.
How to do Child’s Pose:
- Start on your hands and knees, with your wrists under your shoulders and your knees under your hips.
- Slowly sit back onto your heels and stretch your arms forward.
- Rest your forehead on the ground and hold for a few breaths.
- Relieves stress and tension in the back and neck.
- Helps improve digestion and blood flow.
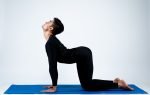
2. Cat Cow Pose :
This pose stretches the spine and releases tension in the back muscles.
How to do Cat Cow Pose:
- Start on your hands and knees, with your wrists under your shoulders and your knees under your hips.
- As you inhale, arch your back and lift your head and tailbone towards the ceiling.
- As you exhale, round your spine and tuck your chin towards your chest.
- Helps improve spinal flexibility and posture.
- Massages the digestive organs and helps improve digestion.
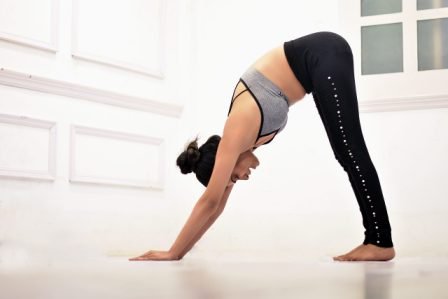
3. Downward Dog Pose :
This pose strengthens the back muscles and stretches the hamstrings and calves.
How to do Downward Dog Pose:
- Start on your hands and knees, with your wrists under your shoulders and your knees under your hips.
- Lift your hips up and back, straightening your arms and legs.
- Relax your head and neck and hold for a few breaths.
- Helps relieve tension in the back and neck.
- Strengthens the arms, shoulders, and back muscles.
Remember to take it slow and listen to your body. Always consult with your healthcare provider before starting any new exercise program.
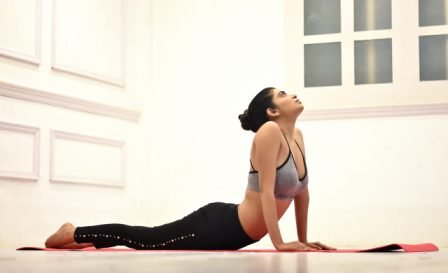
4. Cobra Pose:
Cobra Pose, also known as Bhujangasana, is a popular yoga pose that helps strengthen the back muscles, increase spinal flexibility, and open the chest and shoulders. It is a gentle back bend that can be practiced as a standalone pose or as part of a yoga sequence.
How to do Cobra Pose:
- Begin by lying flat on your stomach on a yoga mat, with your legs extended and the tops of your feet resting on the mat. Place your hands under your shoulders, fingers spread wide, and palms pressing into the mat.
- Engage your leg muscles by pressing the tops of your feet and thighs into the mat. Draw your tailbone down towards your heels to lengthen your lower back.
- On an inhalation, slowly begin to lift your head and chest off the mat, using the strength of your back muscles. Keep your elbows bent and hugged in towards your body. Avoid pushing with your hands or straining your neck.
- Roll your shoulder blades down and back, broadening across your collarbones and opening your chest. Imagine lengthening your spine and reaching the crown of your head forward while keeping your gaze softly forward or slightly upward.
- Take slow, deep breaths as you hold the pose, maintaining a sense of ease and relaxation in your body. Feel the gentle stretch in your abdomen, chest, and the front of your shoulders.
- To come out of the pose, exhale and slowly lower your chest and head back down to the mat, releasing any tension in your back.
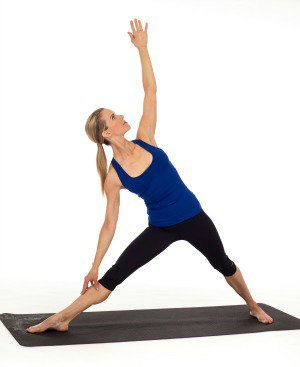
5. Triangle Pose:
Triangle Pose, also known as Trikonasana, is a foundational standing yoga pose that provides a deep stretch for the entire body, especially the legs, hips, and torso. It is a powerful pose that improves balance, strengthens the core, and enhances overall flexibility.
How to do Triangle Pose:
- Begin standing at the top of your mat with your feet hip-width apart. Take a step back with your left foot, keeping your feet firmly grounded.
- Turn your left foot out to a 45-degree angle and align the heel of your left foot with the arch of your right foot. Your front heel should be in line with the arch of your back foot.
- Inhale and extend your arms out to the sides at shoulder height, parallel to the ground, with your palms facing down. Keep your arms engaged and actively reaching.
- Exhale and extend your torso to the right, shifting your hips slightly to the left. Imagine a line of energy running from the center of your pelvis through the crown of your head.
- As you reach to the right, hinge at the hip joint and lengthen your torso over your right leg. Keep your spine long, avoiding any rounding or collapsing.
- Once you’ve reached your maximum stretch to the right, lower your right hand to the shin, ankle, or the floor on the outside of your right foot. Extend your left arm straight up towards the ceiling, aligning it with your shoulders. Your chest should be open and facing forward.
- Keep your neck in line with the spine, maintaining a neutral position or gazing up at your left hand if it feels comfortable for your neck.
- Hold the pose for several deep breaths, feeling the stretch along the right side of your body and the opening in your hips and chest.
- To come out of the pose, inhale and press firmly into your feet. Engage your core muscles as you lift your torso back up to a standing position, bringing your arms parallel to the ground again. Turn your feet to face forward, and repeat the pose on the other side.
Those yoga poses can help you to relief both upper back pain & lower back pain. so try to do those yoga poses properly.
Tips for Practicing Yoga Safely to Help Relief Back Pain:
When it comes to using yoga for back pain relief, there are some important tips to remember. This will ensure your practice is safe and effective.
Here are some tips to help you get the most out of your yoga practice:
- Listen to your body:
Pay close attention to any sensations or discomfort you feel during your yoga practice. Modify or skip any poses that don’t feel right.
- Warm up before practicing:
Start your practice with gentle stretches to warm your muscles. Prepare your body for more intense poses.
- Focus on alignment:
Proper alignment is essential for preventing injury and benefit from each pose. Practice each pose correctly, and don’t push yourself too hard.
- Use props when needed:
Props like blocks, straps, and blankets can help you achieve proper alignment. It also makes poses more accessible if you have limited flexibility or mobility.
- Practice regularly:
Consistent practice is key to seeing results. When using yoga for back pain relief, practice a few times a week to start seeing the benefits.
By following these tips, you can use yoga for back pain relief safely and effectively. Always listen to your body. Modify your practice to ensure your safety and comfort.
Common Mistakes to Avoid When Practicing Yoga for Back Pain:
- Forgetting to Warm-Up:
Warming up before yoga back stretches is essential to prevent injuries and strain.
- Holding Poses for Too Long:
Knowing your limits and not holding a pose for longer than your body can handle is important.
- Overarching Your Back:
Avoid overarching your back in poses like the downward dog or cat-cow, as this can worsen your back pain.
- Neglecting to Breathe Properly:
Focus on deep breathing throughout your practice to increase blood flow and oxygen to your back muscles.
- Not Using Props:
Yoga blocks and straps can be helpful tools in easing into poses and supporting your back.
- Pushing Through Pain:
Listen to your body and stop immediately if you feel any pain. Never push through pain in any yoga back stretches.
- Skipping Resting Poses:
Resting poses like a child’s pose or corpse can relieve and relax your back muscles. Do not skip them.
- Practicing on a Hard Surface:
Using a yoga mat or other cushioned surface is important to avoid putting too much pressure on your spine and back muscles.
When practicing yoga for back pain, it is crucial to avoid these common mistakes to ensure you are doing the poses safely and effectively.
However, it is also important to remember that everyone’s body is different, and what works for one person may not work for another.
By avoiding these mistakes and practicing yoga regularly, you can relieve your back pain, improve your posture, and increase your overall flexibility and strength.
Give yourself the gift of a healthy and pain-free back by incorporating these yoga poses into your daily routine.
Conclusion:
Yoga is a highly effective method of reducing and preventing back pain. Whether you are dealing with chronic pain or want to avoid it in the future, incorporating yoga into your daily routine can make a big difference.
Understanding the causes of back pain, the benefits of yoga, and practicing safely are all important factors to keep in mind. Following these tips and practicing regularly can improve your posture, strengthen your core muscles, and increase your overall flexibility.
So take some time to explore different yoga poses, listen to your body, and start your journey to a pain-free back today!